Tuesday, September 28, 2010

Michaels Coupon!


I was really excited to see the new Friends and Family Coupon in my e-mail this morning. This one is 20% off your entire purchase, including sale item. It excluded clearance and a few other select items. It is good for three days Sept. 30th-Oct. 2nd. I will be there with bells on, to stock up on holiday supplies. Go here to get yours. Enjoy!

Thursday, September 23, 2010

YEA!! Blog Awards


I am so excited to be receiving  this lovely blog award from Tish of  My Mommy Quacks. This is my second award, and I think I'm still shocked people enjoy my blog. I try so hard to keep my blog updated with things I love, and hope my followers will love too. Thanks so much Tish, and my lovely followers for being so supportive.

It is so hard for me to choose only 5 other lovely blogs. I follow so many and they are all deserving, but here goes...

I have a few fun things in store for my little blog. I will be having my first product review soon, and as soon as I reach 100 followers I will be having a little giveaway. So tell your friends!


Tuesday, September 21, 2010

Simple Ruffle Chair Cushion Tutorial


This was a project that I have been wanting to do for a while, and for some reason it always got put aside for something else. A few days ago I was looking through updates from blogs that I follow, and was so excited to see an update from Disney of Ruffles and Stuff. She was one of the first blogs that I found when I was sucked in by the blog world. I had started sewing a little, but found so much inspiration on her blog. It is now an obsession of mine. It's so much fun to see what I can create from something I already own, or a yard of fabric. Her return was only for one post, but I will hold out hope for more, and will always go to her blog for inspiration. After reading her post I knew I wanted to add ruffles to my chair cushion. I think everything is better with ruffles.


You will need two pieces of fabric. You will need to measure the chair you will be using. Mine chair was 12x12. When cutting my two pieces of fabric I added an 1".


To make my ruffles I cut three pieces of fabric 2" wide and 20" long. Fold them in half long ways and iron. Turn your tension on your sewing machine down to 0. Sew the fabric strips closed with a straight stitch. By pulling the bottom thread (bobbin thread) your fabric will ruffle. You may have to do this on both ends to get the ruffle the way you want it.


I cut four 11" pieces of ribbon, for ties on my cushion. I then pinned my ruffles to both sides and the front of one piece of my face up fabric, also pinning the ribbon on the back. I placed the second piece of fabric face down on the other piece of fabric. Your cushion should be all closed in like pictured above.


Next you will sew both sides and what will be the front of your cushion. As show in the picture above I sewed some of the back closed leaving and opening for you to fill the cushion.


You can buy stuffing for pillows at your local craft store. I used the stuffing out of a standard pillow that has been in my linen closet for a while. When your happy with the fullness, pin it and top stitch it closed. You will have to do that step by hand. I hate hand sewing to, but it's just a little bit.


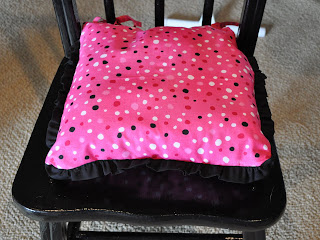
Now your cushion is complete. I can sit and sew a little more comfortable.


Make it Yours @ My Backyard Eden


Sunday, September 19, 2010

Fall Fun Photography!

It has been a great weekend for outside photography where we live. Living in the South has it's perks this time of year. It has been high of 85 degrees all weekend. Just beautiful for letting the kids play outside and catching a few cute shots.


I couldn't resist taking pictures of all of my moms cute harvest decorations. Everything had such great colors.


It looks like I only take pictures of my son, but my daughter always runs from the camera. My son always runs towards me saying "cheese". Those are my daughters hands in the last picture. I got by with that one. I'm trying to wait patiently for it to get cooler, to take some family shots for Christmas cards. I don't really want to wear shorts and tank tops in my Christmas card photos. Thanks for stopping by my blog. I love followers and comments, so feel free to leave one.


mingle mondays button

Thursday, September 16, 2010

Thursday Blog Hop!

I'm blog hopping today. I decided to join on that I have not joined before. Thirsty Thursday over at Obviously Marvelous. I hope everyone is having a great Thursday!


Obviously MARvelous

Tuesday, September 14, 2010

Halloween Skirt with Leggings


I am really excited for fall this year. My kids are a little older to enjoy all of the festivities. We started going to a local pumpkin patch a few years ago, and it is almost that time again. I picked up some really cute Halloween fabric at Joanns, and decided to make a twirl skirt to match the Halloween shirt that I already purchased for my daughter. The twirl skirt may be one of the easiest skirts I have made and is great for a beginning sewer. You can go here for a full tutorial. I decided to make matching leggings from a tutorial I found from Finding My Feet. They were really easy and inexpensive. I bought the socks from Target for $2.00.


I will be linking to the link parties below.


Saturday, September 11, 2010

Catching up on scrapbooking

I have been so caught up in my sewing projects I have neglected my scrapbooking. I have spent most of my weekend catching up, and I still have plenty more to do. I thought I would share some of my progress with you.


This was a fun layout for me and a little different than what I normally do. I used Bazzill card stock, and Bazzill pattern paper. I purchased it recently at Michael's specifically for this project. I thought the colors matched the pictures really well. For accents I used Paper Studio Brads.


I splurged a little more than I normally do for this project. The blue star paper, and red card stock is Paper Studio. The white paper is Doodlebug Designs, and is glittered, but you can't tell it in the picture. For accents I used buttons, ribbon, jewels, and paper stars. This was a really easy layout to put together, it was just the paper I chose that cost a little more.


This was a really fun layout for me, and I'm so happy how it turned out. My kids got their first pairs of Converse shoes for their birthday. They look so cute on I couldn't help but scrapbook about it. I started with a 5x7 collage. I made the collage on Picasa, and developed it at my local Sam's Club. I couldn't believe that it was only 38 cents. I used Paper Studio card stock, and letters. Close To My Heart rub on, which I have found to be the easiest ones to work with. I cut out the Converse logo off the shoe box, and was done.


Thursday, September 9, 2010

Vampire Diaries Premier


I know this is not usually the type of thing I post about, but I thought I would share anyway. I will start by telling a little back story of why I would post this in the first place. I was recommended by a friend to give the Twilight books a shot, and was sucked in by the vampire phenomenon that we are in right now. When I heard they were making a show called Vampire Diaries I was really excited. When I found out it was on CW I thought it might be a little cheesy, but was pleasantly surprised. They had their season 2 premier tonight, and it was great. If you are a fellow Twilight lover, you may want to check Vampire Diaries out. If you don't care anything about the vampire craze, that's ok. If you would rather watch it for the really hot guys in the show, that's fine. Truth be told, that's half the reason I watch it. Seriously, where do guys that look like that come from anyway?

Wednesday, September 8, 2010

Blog Hop Wednesday!

It's that time again, to hop all over blog land to find great new blogs. I hope everyone joins me.


Monday, September 6, 2010

Fabric Camera Strap Tutorial


My camera and I have became one, in the past month, because of my photography classes. I have seen so many tutorials for a camera strap cover. I thought I would jump on that band wagon, and make my camera a little more FLASHY. Ha! Forgive me for my terrible joke. The strap I made is very simple, and I used fabric that I had left over from a previous project. I love it when that happens. I'm not sure if all straps are standard, but these are the measurements that I used for my strap. You may want to measure yours to be sure.


I cut my fabric 3 1/2" wide, and 20" long. Next you fold all four edges 1/4" over and iron.


Then you will sew closed the folded short ends.


In the last step I added fabric flowers. You can find the tutorial for those here. You will have to hand sew these on. You will want to do that before you sew the cover closed. Lastly you will fold the cover over longways, and sew closed. Now you have a fun cover for your camera strap. I can definitely feel the difference wearing it around my neck. I think it is much more comfortable. I hope everyone enjoys.

I would also like to thank Cheri, at I Am Momma Hear Me Roar, for featuring my graffiti stencil shirt on her you roared segment. I am also super excited about reaching 50 followers. I'm considering having a giveaway when I reach 100. Maybe a fabric sunglasses case, or a fabric camera strap cover. Let me know what you think.


LinkWithin

Related Posts with Thumbnails