Tuesday, December 13, 2011

A little Christmas Cheer

I have been obsessed this holiday season to get good pictures of my tree. I found many great tutorials online but decided to go with the one from Kevin and Amanda. They not only showed a great way to get my lights to pop, but they added a fun little addition I had to try. She used an 85mm 1.8, but you could easily use a 50mm 1.8, or 35mm 1.8. For my photos I used my 50mm 1.8 lens.


Nikon 50mm 1.8
Manual Mode
f/1.8
1/30 sec
3200 ISO


Nikon 50mm 1.8
f/1.8
1/30 sec
3200 ISO

For this shot I used my manual focus and simply turned it until it was out of focus. You will see the light go from small to big circles.


Nikon 50mm 1.8
f/1.8
1/30 sec
2500 ISO

This is where I used the tutorial from Kevin and Amanda. It also made it seem like I used a fish eye lens.


Nikon 50mm 1.8
f/1.8
1/30 sec
3200 ISO

Here is Elfis getting in on the fun.


Thanks for stopping by my blog. I hope everyone has a great Holiday season.


Thursday, December 8, 2011

A message from Santa!

My kids are 2 1/2 this Christmas so we have started out little traditions around our house. They are learning about Santa and the nice/naughty list. Of course, we also have our Elf on a Shelf named Elfis. I am an Elvis fan so the name is very fitting. The kids always have fun looking for him in the mornings and I always have fun thinking of what shenanigans the little guy should get into the night before. If you haven't decided to get one they are a lot of fun. I would have loved it when I was a kid.

Along with our elf tradition we have a message from Santa. My sister told me about a website called Portable North Pole, which you can find here. You can customize a message to your kids and receive a video email from Santa. It is really cute, and the kids love hearing Santa say their names and talk about that special present they have asked for. You can also send them to adults which could be fun for those scrooges in the family.

I hope everyone is having a great holiday season. Thanks for stopping by.

Monday, October 17, 2011

Holiday and Pinterest fun!

I have been such a bad girl lately with not updating my blog the way I should. I have been so busy with trying to get my photography business off the ground that I have not had much time for sewing and crafting. I'm sure to get more done now that colder temps are on the way. I have several sewing ideas that I plan on sharing with you all very soon. Especially now that my mother in law has let me take care of her serger while she does not have a place for it. I'm super excited about it even though I have no idea how it works.

While I was working on my photography business I stumbled upon a new adventure. I have found a love for digital scrapbooking and digital card making. It could be blamed on my sister in law. She was nice enough to let me take newborn photos of my nephew and I decided to try my hand at making his birth announcements. Surprisingly they turned out great and a new obsession was born. I have designed a couple of cards and put them on my new Etsy store LRP Design. I am working on more and will be adding them as I have them. Right now it's only holiday cards, but I will be adding other kinds soon. Here are a couple of examples.


I also thought I would share something that I learned today. While checking one of my favorite blogs, I am momma hear me roar, I learned how to see what people are pinning from your blog to Pinterest. Copy and paste this link

http://pinterest.com/source/twininspiration.blogspot.com/

Be sure to change to your blog address. I think it is so much fun to see what people like about your blog. If you are interested in what I'm pinning you can find my page here.


Thanks for visiting my blog.

Thursday, August 4, 2011

New kitchen additions

Little by little I have made a few changes to my kitchen. Since upgrading counter tops is not an option right now, I have focused on a few little changes. When we built our house I would say my style was very traditional, but now I'm not sure what to call my style. I think it's a combination of modern, a bit of retro, and a dash of vintage. Does that even make any since? I'm not sure, but that's the best description I can make.


Originally I had a bakers rack that didn't really fit in with what I wanted anymore. My original thought for the space was a buffet, but when all the ones I wanted were $500.00+, I decided to go with something else. I looked at several local antique stores, but never really found what I was looking for. After a few weeks of searching, we went to visit my mother in law. They had recently moved and didn't have the space for this desk. It was the perfect size and price (free). All it needed was paint/hardware and VIOLA!
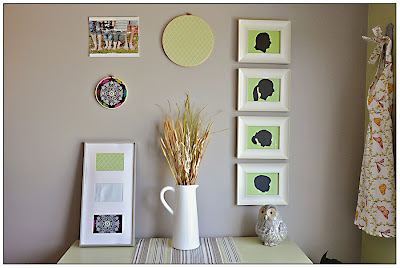


I tried to do my own version of a wall collage. I loved my silhouettes that I printed on green cardstock. You can see my tutorial on how to make silhouettes in photoshop elements here. I also chose a couple of coordinating fabrics to hang in my hoops. I have seen that on several other blogs, and loved how simple and inexpensive the idea was. I decided to refurbish an old photo frame that held three photos, with wrapping fabric around some cork board that I had. I will be a great place to stick notes, maybe a honey do list. :)

You can see how I transferred my photo to my canvas here. This is another very fun and inexpensive project.


These are just a few decorations that were added around the kitchen. The vintage scale is my favorite. I plan on using it in some future infant photo shoots, but for now it works great in my kitchen.


My husband was given the above chair and the chair in front of the desk by his grandfather. They meant a lot to him and I was very happy with how well they worked in the kitchen. I was also happy they didn't need any work. I considered painting them but my husband was not happy with that idea. I guess I can let him have his way just this once.

Thanks for stopping by my blog.
Here are a few parties I will be linking to today


Wednesday, July 6, 2011

Abstract Art Project

I decided to try my hand at another art project. Since I am no artist this project seemed perfect for me. I found this abstract art project on one of my many visits to Pinterest. I love how each one is unique.


I chose a 12x12 canvas for this project, but you could use any size you like. I used 1" painters tape and placed it randomly all over the canvas. You could use masking tape if you have that on hand.


Be sure to extend the tape over the edges of the canvas so you will see the pattern on the sides. Now you are ready for the spray paint. You may need two coats.


When you pull the tape off you have fun stripes. How easy is that?

Thanks for stopping by my blog.

Thursday, June 23, 2011

Making a Silhouette with Photoshop Elements {Tutorial}

I hope everyone is having a wonderful beginning to Summer. We have been so busy around here with swimming trips, outside play time, yard sales, two year old tantrums, etc. I wanted to take a little break from that and share a little project I did. I have plans on changing some things up in my kitchen, like painting, and some new decor. I'm really excited about it. My kitchen has not had any updates in seven years, so it's time. While blog stalking the other day I saw the post by Jessica at Happy Together. It was an awesome chalkboard wall, but while scrolling down she posted a few other Pinterest finds. I loved the wall of silhouette's by Laura Winslow Photography. I have just the place for it in my kitchen. I have made these in the past the old fashion way. I just printed a profile picture and traced it onto black paper. That worked fine, but was a lot of work for more that one silhouette. I decided to use my Photoshop Elements to make things a little quicker.

I will warn you that this post may be a little long with several screen shots, but I always do better with tutorials with lots of explanation and photos. If you are not real familiar with your Photoshop program this my be a good way to learn a little more about it. I have yet to grasp everything this program is capable of. If the screen shots are not big enough you should be able to double click on them to see them bigger.


First choose a profile picture. If you are making one of a girl/woman you may want to have the hair up. It makes the silhouette better in the end. Open the photo in your program. Go to your full edit workspace. Next your will want to make a duplicate of your background photo. You can do this by right clicking on the little photo on the right of your screen, and chose duplicate image.


Now, under the drop down arrow right above your duplicate image, you want to choose "vivid light".


At this point the coloring in your photo should have changed a little. Don't freak out, this is how it's supposed to happen. You can now flatten your duplicate image by right clicking on it, and choosing flatten. 


Now choose your magnetic lasso tool to trace around the head and neck of the photo. When you are finished double click and you should see marching ants where you traced.


It's time to fill the image by right clicking where your have traced and have the marching ants. You will choose "fill selection". Under contents choose black.


Now you should feel like your getting somewhere. Next, click "select" and then "inverse". You should now see marching ants around the frame of your photo.


Lastly, you go to "edit" and select "delete". You should now be left with your silhouette.

How fun and long was that! It seems like it takes a while at first, but after a couple it takes no time at all. Thanks so much for checking out my blog. Let me know it you have any questions. I will try my best to help.

Friday, June 17, 2011

My Etsy Store {Reagan's Creations} Now Open!

I'm excited to say that my Etsy store Reagan's Creations is now open. I opened it a while ago and didn't do much with it. I decided to start listing things because of all the encouragement from my friends and family. I love creating things, so why not share it with everyone else. Right now my store is a little sparse, but I hope to fill it with goodies soon. Right now my plans are to list PDF patterns, hand embroidery,  and other accessories. I guess kind of an assortment of things. The story of my life, but creativity can not be limited to one thing. If only my husband understood this! :) 


Tuesday, June 7, 2011

Getting lost with Pinterest

I have been hearing about Pinterest all over, so I thought I would check it out. The only catch is it works by invitation only. I submitted for acceptance a few weeks ago with no luck. When I was invited by an old high school friend I was excited. I have wasted my whole nap time break searching all over the sight. I heard it was addictive and they were right. As a crafter it is a great resource for inspiration. I'm sure it's another addiction I did not need, but it's to late now. I only have a few boards right now, but I will have more soon. If you are interested but are having trouble with an invite let me know by sending an email, or leave me a comment, and I will send you an invite. I will need your email address for this though.

Monday, May 2, 2011

Bags, Purses, and Clutches... Oh my!

I have developed an obsession with purses lately. I think it's from not having a purse of my own for 2 years. I have lots of purses but they are usually taken over by sippy cups, and snacks. Now that my kids are older and I don't have to pack the house for them, I have started carrying my own purses again.

If you follow my blog you have probably seen all of the Amy Butler fabric that I use. I'm pretty sure she is my favorite designer. Not just for her fabric, but she has great patterns too. I bought her Frenchy Bag pattern a year ago, in the hopes that someday I would be free of the diaper bag. That day has finally came. I bought this fabric from Joanns a month ago, because it looked so cute for Spring. It's a light weight cotton, but worked fine with a little interfacing for this project. I think I will also make another one with a heavy weight fabric for the Winter. I also made a little clutch out of the same fabric. I used a tutorial from Little Birdie Secrets, for a Kindle case. I just changed the measurements a little.


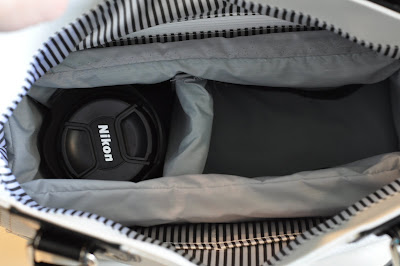
I can't take credit for the other bag in the photo. I bought that one from TJ Max for $20.00. I did make it better by making an insert for my camera. I have been looking at stylish camera bags for a while, but couldn't believe the price tag. So, when I found the tutorial from Little Blue Boo, I knew I had to try it. It was very simple if you are in need of a camera bag.


Thanks so much for stopping by my blog. Here are the parties I will be linking to this week.

Monday, April 11, 2011

You know you're a mom when...

I thought I would take moment away from my normal sewing or craft projects to tell you about something I read the other day. The unthinkable happened a couple days ago, my Kindle battery died. :( I have had it since January and this is the first time I have had to charge it. I can't believe how long the battery life is. I was then forced to do something crazy and pick up an actual book. It felt so wrong, like I was cheating on my Kindle. :)

The book I picked was one that was given to me when I was pregnant called Life Lessons for  Busy Moms. It's kind of like a Chicken Soup book. I chose it because it seemed like an easy read to take outside while this kids played. I remember scanning through it while I was pregnant and didn't really relate to much. It's funny how life changes after becoming a mom. Something that stuck out to me was a list titled You know you're a mom when...

1. You plan your day according to when Sesame Street is on.
2. You have signed a check with a crayon.
3. You find Goldfish crackers in the glove box of your car.
4. You wipe other kids noses.
5. You have accidentally brushed your teeth with Desitin.
6. You have caught spit-up with your hand.
7. You leave for a date with your hubby with a diaper bag instead of a purse.
8. You have memorized the lineup of Saturday morning cartoons.
9. You have finally paid for all of your groceries and leaving when you realize your child has lost a shoe somewhere in the store.
10. You can recite Goodnight Moon and Green Eggs and Ham by heart.
11. You let your child sit in his dirty diaper until Oprah is over.
12. You have a fifteen minute conversation about your baby with a complete stranger at the grocery store.
13. You filled up your child's baby book before her first birthday, or tooth appeared.
14. You silently curse people if they call during nap time.
15. You forgot you mother in laws first name because you now refer to her as Grandma.
16. You arrange your travel plan based on McDonald's playland locations.
17. You are just as surprised when you sleep through the night as when your child does.
18. You consider the person who invented the sippy cup a genius.
19. You see a mom from your child's playgroup and know the child's name but not hers.
20. You consider it a major triumph if you shower by noon.
21. You justify every excessive crying spell with teething.
22. You pick up the phone and call your mother when your baby rolls over for the first time.
23. You have kept your favorite babysitter a secret from other mothers in your playgroup.
24. You have your pediatrician's phone number on speed dial.
25. You own the entire Baby Einstein DVD collection.
26. You find yourself humming the Rubber Duckie song in the shower.
27. You have dressed your child in whatever is on top of the laundry pile.
28. You cry at Johnson & Johnson commercials.
29. You would trade your whole life savings for one good night sleep.
30. You see your parents in a whole new light.
31. You consider parenting to be the best job in the world.

I have to say that I don't relate to all of these, but I related to enough to not be sure if I should laugh or cry. I do relate to the last one most of all. I'm blessed to be a stay at home mom, and wouldn't trade it for the world. I will admit some days are just harder than others.

I hope everyone has a great week. Thanks for stopping by my blog.

Friday, March 25, 2011

Super T Shirt with Cape {Tutorial}

Now, for my second, Lets Hear It for the Boy, t shirt project. My original thought was to make a Superman shirt, but then I decided to personalize it. My sons name is Tristan, but everyone calls him T. So, it seemed fitting to make him a Super T shirt. 


Supplies:


Shirt: ($2.99 Hobby Lobby)


Knit Fabric: ($9.99 yd. at Joanns. I used two colors. You could use old t shirts if you have the right colors.)


Embroidery Floss: ( .39cents each I used two colors)


Embroidery Hoop: (Optional)


Velcro: ( $1.50 pack of 3 squares Hobby Lobby)


Personalized letter: ( I just freehanded a block letter and cut it out)


Coordinating thread, Scissors, and Sewing Machine


My first step was pinning the letter to my fabric and cutting it out. I cut the bottom fabric a little bigger than the letter pattern, and cut my top fabric the same size as the pattern. 


Next, I pinned and straight stitched around both letter layers. I have only used knits a few times, but I love that they don't fray. 


The next step is a fun little addition to the applique. It is optional, if you just want to sew it and leave it. I just thought it made the applique pop. For this step I used two embroidery floss colors, and my embroidery hoop to stabilize it while sewing. I got the floss idea from Dana over at MADE which you can find here.


To make the cape, I cut the knit the length and width of the shirt. To make it look more like a cape and not a square, I cut around the shoulders and neck. Again, using knit was nice for this project, because I didn't have to hem all around the cape. 


I wanted to be able to take the cape off for washing, so I used velcro. You could just sew it on if you prefer, I just found this easier. 


I decided to add a little floss to the bottom corners of the cape. I just thought it looked cute. 


I hope you enjoyed my last two boy projects. I hope to have more soon. Thanks for stopping by my blog. If you have any questions please leave them in my comments and I will try my best to help.


LinkWithin

Related Posts with Thumbnails