Sunday, August 29, 2010

I Was A Really Good Mom Before I Had Kids {Book Review}


I decided to add a little something new to my blog. I was inspired by my husband who started a blog to review movies. If you are a movie lover check it out here.Reading is another hobby of mine. Especially with the winter coming soon. There is nothing better than wrapping up in a blanket and reading a good book. A friend recommended this book to me when my twins were getting mobile. So many changes were happening at one time, I wasn't sure how to handle them all. The name of the book described how I was feeling perfectly. I always knew that being a mother wouldn't be easy, but I don't think your ever prepared for the stress that motherhood brings.


I related to the book from beginning to end. At the beginning of each chapter there is a quiz. You check each statement that applies to you. My personal favorites are... "You secretly wish you had your own apartment", and "you find that slowly browsing the isles at Target, by yourself, is better than therapy". Don't get me wrong I love being a mother, and went through many challenges to be one, but it is the hardest thing I have ever done. In the book they interview mothers from all different parts of the US, stay at home moms, and moms who work. That way all moms would have someone to relate to. I'm so happy I read this book when I did. It helped me feel less alone. As mothers we are always under stress from a decision, that you are afraid you may get judged for... cloth diapers, or disposable, shots, or no shots, spank, or don't spank. I say make a decision that is best for your family. I asked my mom the other day, how she made it look so easy? Our house was always clean, dinner always ready at five, and our laundry was always done. Her response..." I don't know, I just did it." It was not a helpful response, but it's reality. We don't really know what we are doing, we just do it. On a good day, we get it right. I really enjoyed the book, and recommend. It makes you feel less alone in motherhood.


mingle mondays button

Friday, August 27, 2010

A Blog Award!!


I was shocked and excited when I found out that Beth over at Two Monkeys & A Washtub had chosen my blog as one of her blog award recipients. Thanks so much for thinking of me.

The Rules:
  • Thank the blogger who awarded it to you.
  • Sum up your blogging philosophy, motivation, and experience using 5 words.
  • Pass it on to 10 other people you feel have blogs with real substance.

5 words to sum up my blogging.

  1. Fun

  2. Inspiring

  3. Welcoming

  4. Time-Consuming

  5. Worthwhile

It was really hard for me to pick just 10 blogs to give this award to. I follow so many. I tried to choose the ones I find myself going to alot. The ones that inspire me and have alot to offer to others. They are all great blogs so go to the links below and check them out.

The Truth about Motherhood

A Forty Year-Old Ranch

Mandys Creative Corner

Making Mud Pie

Delia Creates

Paper Treats

My Blonde Ambitions

Sisters 4 Say More is More

Rubies & Pearls

Atelier Caroline


Wednesday, August 25, 2010

Graffiti Shirt {Finally a project for boys!}


Maybe I'm the only one, but I always have crafters block for boy projects. I blame it on my husbands strict standards on what his son is allowed, and not allowed to wear. I always feel bad because I make so much for my daughter. It doesn't seem fair. I was really excited to find Cheri's blog I Am Momma Hear Me Roar. Her blog is filled with great craft ideas for boys. The one that really caught my eye was her High Voltage Tee, which you can find here. After seeing her post I went out the next day and purchased all of my supplies from Michael's. I have no experience with stencils, but it was really easy. If you have older boys they may want to graffiti a shirt themselves. With supervision of course.


Supplies:
Tulip Fashion Graffiti paint (for paint cannon)
Tulip Fabric Paint Cannon
Fashion Graffiti Stencils
Shirt


I used painters tape to secure wax paper around the stencil, to prevent over spray. I also used a piece of cardboard to put inside of the shirt to keep the paint from bleeding through. I then pumped the paint cannon and sprayed until I was happy with the coverage.


After carefully taking the stencil off. A muscle car was revealed. A 1967 Mustang Fastback to be exact. My Husbands words, not mine. Needless to say he was pleased. They also have some fun girl stencils available. I hope everyone tries this project. It's inexpensive, fun, and easy. Even for those who don't know much about stencils.


I've joined the Frogs & Snails, Puppy Dog & Tails link party today, over at Seven Thirty Three. It's a link party just for boys.

Tuesday, August 24, 2010

Tuesday Blog Hop!

I'm participating in a Tuesday blog hop. I hope everyone checks out these three fun blogs. I you haven't participated in a blog hop yet, you should. Its a great way to find new blogs and add to your friends.


Monday, August 23, 2010

Adventures in Photography {Take 1}

My husband bought me a DSLR for my birthday 4 months ago. I loved it, but was very intimidated. I tried reading the manual, but it confused me more. When someone told me about The Pioneer Woman, I immediately started reading her tutorials. She laid out the basics in plain English, which was more than I can say for my manual. From that moment I was hooked and determined to learn more. I was so excited when I found a local studio that taught affordable beginner classes. I wanted to share some photos from my past lesson, and I'm proud to say the instructor didn't find to much to pick on. I still have another class to go, but now I'm dying to take the advanced class. No one told me photography classes would be so addictive.


Thursday, August 19, 2010

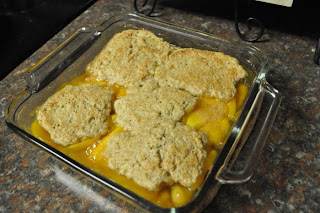
Homemade Peach Cobbler {YUM!}


It is a little unusual for me to post food on my blog, but I was so proud how my cobbler turned out. I had to share. It was my first attempt at a cobbler from scratch. This may not be hard for some people, but I am no cook. I think my husband was a little surprised by my attempt. He said he didn't want any because he doesn't like peaches, but I think he thought it would be awful. It was actually delicious, if I say so myself. I wish I could say that it was a family recipe passed down from generations, but it was right out of a Better Homes and Gardens cookbook. You can also go the their website here to find more great recipes. Since this recipe turned out I may try more. I may just do like the movie Julie and Julia, and cook my way through the Better Homes and Gardens cookbook instead of the Julia Child's. Maybe I will even get my husband to try something. Come to think of it, during our eight years of marriage I have never heard him say he doesn't like peaches. Suspicious!

Recipe:

Peaches
1 cup all purpose flour
1/4 cup sugar
1 tsp. baking powder
1/2 tsp ground cinnamon (optional)
3 tbsp. butter
1 beaten egg
3 tbsp. milk


Filling Preparation:

In a saucepan combine 1/3 cup sugar and 1 tbsp cornstarch. Add 1/4 cup water. Stir in 4 cups peaches (about 4 peaches). Cook and stir till thickened and bubbly.

Topping:

Mix flour, sugar, baking powder, and optional cinnamon. Cut in butter till mixture resembles coarse crumbs. Combine egg and milk. Transfer filling to an 8x8 baking dish. Drop filling into five mounds atop hot filling. Bake in a 400 degree oven for 20 to 25 minutes or till a toothpick inserted comes out clean.

Tuesday, August 17, 2010

Easy Twirl Skirt Tutorial!

I chose the twirl skirt to do as a tutorial this week because it was super easy. I completed it before nap was over. I love those projects. I wanted something that my daughter could finish out the summer in and still wear this fall. I imagine some cute leggings and a long sleeved appliqued shirt.


Supplies:

Main Fabric
Trim Fabric
1" Elastic
Thread
Scissors
Pins
Iron
Sewing Machine


First you will need to cut your main and trim fabric. I am making 18 months. My main fabric will be 9" x 35". My trim fabric will be 4" x 35". If you are making a smaller or bigger size I would lower or raise the measurements by an 1". I will then cut my elastic 17.5". The rule of thumb for cutting elastic is to measure your child's waist and subtract 2".


I took my trim piece and folded it in half long ways, then pressed. Take your main fabric and fold 1/2" and again 1", press.


Pin the trim fabric to the right side of the main fabric and sew. Fold the trim fabric down and press. Top stitch on the main fabric. This gives it a more finished look.


After placing right sides together pin, and sew closes. Now it is starting to look more like a skirt.


Now it is time to sew the casing closes. Stitch along the edge of your previous fold. Be sure to leave an opening to guide your elastic through. I find it easiest to attach a safety pin to my elastic to guide through the casing.


After your elastic has been guided through, zigzag stitch the ends together. Now it is time to sew your casing closed. You made it. Now you have a finished twirl skirt.


Please let me know if you have any questions. I would also love to see everyones finished twirl skirts if you try the tutorial.


Photobucket


Sugar and Spice Link Party at Seven Thirty Three

Sunday, August 15, 2010

Serger of my dreams!! {Sew, Mama, Sew!}


Sew,Mama,Sew is one of my favorite blogs to visit for anything sewing. On one of my daily visits I saw that they are having a giveaway for a Husqvarna Viking Serger. I have wanted one for a while but never thought that this brand would be an option. This one retails for $1,199.00. The ones that I have been looking at retail for $150.00. That is why this serger is the one of my dreams. All I have to do is post about how this macine would make my life better. When I think about all the project possibilities this serger could bring, and having the chance to pass a machine like this along to my daughter. It puts a huge smile on my face. Cross your fingers everyone. If I win I promise to fill this blog with tons of great projects.

Tuesday, August 10, 2010

Tank top refashion


This is a great way to make something old new again. After seeing all the ruffle tank tops at Old Navy and many refashions on other blogs, I decided to try one for myself. I had scrap eyelet and a tank top I bought a year ago. Together it was a perfect match. It was very easy and only took about 20 minutes. It was a great nap time project.

I cut my eyelet 2 1/2 inches wide and 17 inches long, to allow gathering.


Gather and pin down the center of the strap. This is where you want to sew.


I decided to add a fabric flower to add a little extra flare. You can see my tutorial for the fabric flower here. 


Momma Go Round

Monday, August 2, 2010

Antique Domestic Sewing Machine


This may come as a surprise to some of my close friends and family, but I have recently found love for anything vintage. Like I really needed another addiction. The blame can be placed on my sister in law Ashley, who has all kinds of vintage finds on her blog While visiting a local antique store I saw many antique sewing machines and I had to have one. My husband later surprised me with one that was in really good condition. I have to admit, with my lack of antique knowledge I was not sure what the Domestic brand was. I immediately started my research. I knew the machine was old because it wasn't even electric, but I was thinking the 1940's. I was pleased to find out it could range anywhere between 1911 to 1926. We found a serial number but was not able to locate any records. I found the ISMACS site very helpful with the history of the Domestic Sewing Machine Company. They even had a manual that I was able to print off. I do need a couple of replacement parts. If anyone knows of a place to get them I would really appreciate it. I'm sure I will find more antiques to list. I like having a little history around, and of course once I start an addiction I see it through.


southern hospitality

LinkWithin

Related Posts with Thumbnails