Monday, June 28, 2010

Bubble Skirt with Ruffle Tank Tutorial


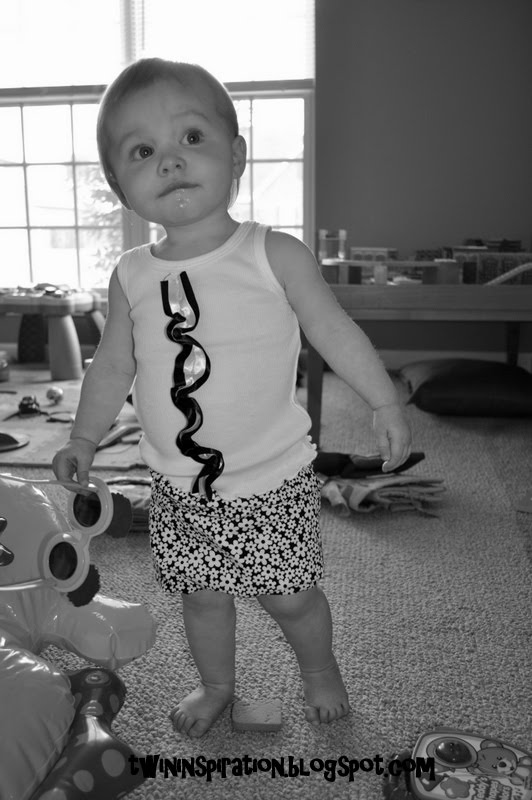
The bubble skirt may be one of the easiest and cutest things I've ever made. Making the skirt and the ruffle tank was a lot easier than trying to get a picture with my daughter wearing them.

Supplies:

Fabric for exterior and interior (I made 18 months and only needed 1/2 yard. You may need more if making for an older child.)

Elastic 1" width for waistband, and 1/4" width about 30" length for bottom of skirt.

Thread, scissors, iron, measuring tape or ruler.

You will need to measure your child from the waist to the knee. Add 1 1/2" to this and that will be what you need for the interior fabric, and add 3 1/2" for the amount of exterior fabric you will need. You will also need the waist measurement for your elastic waistband. Now you have your measurements and are ready to cut your fabric.


After cutting your two pieces of fabric with your measurement you should end up with two large rectangles.


With right sides of fabric together, line up your short raw edges and sew 1/2" seam, back stitching at the beginning and end. Repeat with other fabric. You will now press the seam open on both, and have two tubes.


Insert the larger tube inside the smaller one with right sides facing each other.


Line up and pin the bottom edges all the way around. Sew close to the edge 1/4" in. Sew your second seam about 1/2" in from first seam. Don't forget to leave an opening to feed your 30" of elastic through.


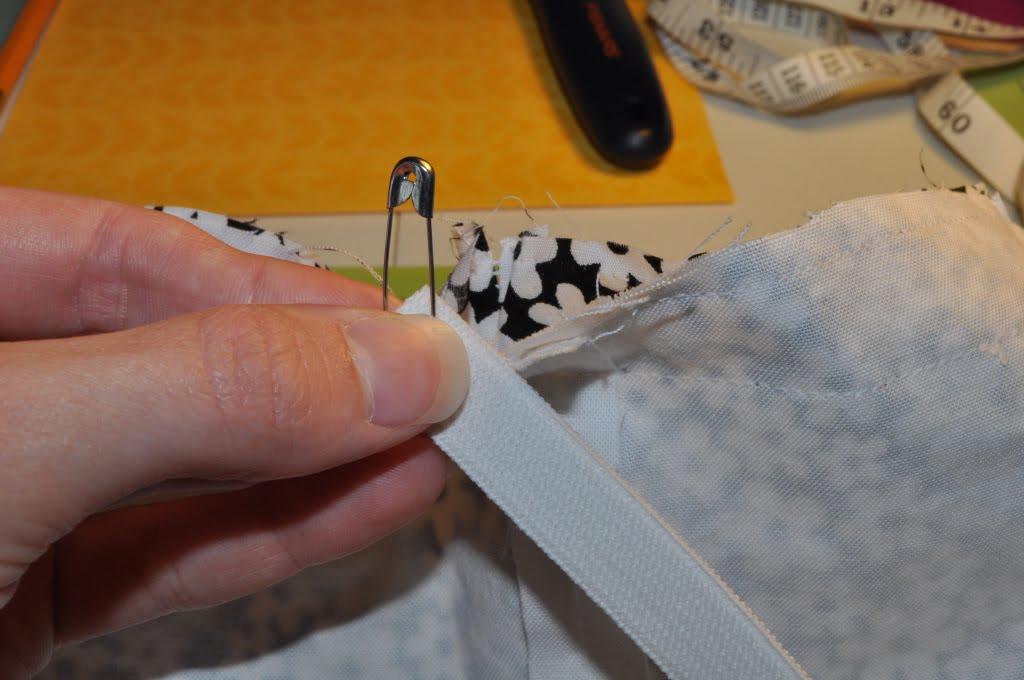
Now attach a safety pin to your elastic to help guide it through the casing you have made. When finished with that sew your elastic together, and tuck in. Sew your casing closed. Now the bottom of your skirt is finished.


Now flip your skirt right side out and it should look like the above picture. Take the edge and fold it in about a 1/2" and press. Then take your pressed edge and fold it over to cover the lining fabric and press. Stitch close to the edge to make a casing for your elastic. Feed your elastic through just as you did for the bottom of the skirt. Finish by sewing the elastic and the casing closed. Now your skirt if done.

Ruffle Tank:

I made this with a 18 month tank to so the ribbon was measured accordingly. You may want to measure if you are making for a smaller child or older child.

I measured the tank from the neckline to the bottom of the tank, and doubled it to allow for the ruffle. My bottom ribbon was 1 1/2" and the top ribbon was 1".


Pin your ribbon together. Don't forget to loosen the tension on your sewing machine to 0. Sew down the middle to the ribbon.


To make your ruffle pull the bottom thread as much or as little as you like, to make your ruffle.


Now you pin the ruffle on the tank, and sew. I decided to only sew the top, middle, and bottom of the ribbon on. Now you have a sweet skirt with a little ruffle flare for your little one.

Wednesday, June 23, 2010

Canvas Addiction!

I have found a new love in canvas projects. If you look around the blog world you will find many different ones. I saw this on one of my favorite blogs, Ruffles and Stuff. She has great ideas including this silhouette project. I did make a few changes for my project.

Supplies:
Canvas (I used an 8X10)
Painters tape
Foam paint brush
paint (I used Liquitex Basics acrylic paint $4.99 @ Michael's. You can also use a 40% off coupon.)
profile photo


When I found a profile picture that worked for this project, I cropped it and changed the size to an 8x10 in Photo Shop. You can also change the size in Picasa if that is what you have. I printed it from my computer on card stock in gray scale. I then carefully cut out the profile.


I used painters tape to tape the silhouette on the canvas, and carefully painted inside it. I loved how they turned out, and I think they will make a great addition to their playroom.


If you have any questions or comments please feel free to leave them. If you are happy with how your canvas project turned out, send a picture my way. I would love to see everyones finished projects, and if you didn't mind I could feature them on my blog.

Monday, June 14, 2010

Pillow Case Dress Tutorial


I have to be honest I did not use a pillow case for this dress. I used fabric that I bought specifically for this project. You are welcome to use a pillow case if that's what you have.

Supplies:

Pillow Case or Fabric
Bias tape (you can also use your selvage)
Ribbon 1 1/2 yards
Safety pins
Scissors
Measuring tape

The Dress size that I am making is 18 months, but if you are needing smaller or larger measurements. Below are the standard dress lengths for little girls.

6-9 months: 14inches
12 months: 15.5inches
18 months: 17.5inches
2T: 19.5inches
3T: 21inches
4T: 22inches
5/6: 24inches
7/8: 26inches


When you are cutting your fabric or pillow case add a couple of inches to your desired length, to allow for the casing fold and hem. For arm holes cut a J edge. I cut 4 inches in width and 4 inches high. If you are using fabric and not a pillow case, now would be the time to sew the side edges together.


I used the selvage from my fabric to make bias, but you can do whatever is easiest for you. For 2 1/2 inch bias tape, you need to cut 2 1/2 inch strips. Mine were about 18 inches long. Cut two strips. I iron both raw edges to the center, then fold and iron in half.


Now pin the bias tape to the arm edges, and sew it along the edges.


Now if is time to make the casing for the ribbon. I folded my fabric over about 1 inch. Sew as close to the edge as possible, to allow room for you to feed your ribbon through.


Now your dress should look like this. To add a little flair I added a pocket. This is optional.


I'm sure there are many ways to make a pocket, and feel free to make it the way you like. This is just how I decided to do mine. I cut two U shapes out of my fabric. Both 6 1/2 inches wide and 7 inches long. I turned them pattern to pattern and sewed along the edges, leaving a small hole to turn them right side out. I cut a piece of ribbon the width of the pocket. I wanted the ruffle effect so I changed the tension to my sewing machine down to 0, then sewed the ribbon on. You pull the excess bobbin thread (bottom thread) on both sides to ruffle. You then put the pocket where you like on the dress and sew on leaving the top open, for a little added flair.


Thanks so much for checking out my tutorial. If you have any questions leave them in my comments and I will answer them to the best of my ability.

Wednesday, June 9, 2010

Drama!

I just wanted to take a moment and let everyone know that my canvas project was featured on Delia Creates. She has great craft ideas on her blog, and I feel so proud to be apart of it. Thanks so much Delia!


When I found out I was having a daughter I had no idea what the future would bring. I now know it is a lot of drama. Don't get me wrong I love my little drama queen, but I could go for a little less. I loved how this page turned out. I used Bazzill Basics card stock, some K&C company patterned paper, and paper studio fibers. I hope everyone is inspired by my drama queen. I know I am everyday.

Wednesday, June 2, 2010

Distressed canvas project


I found this distressed canvas project on deliacreates.blogspot.com, and had to try it. It was a project that my husband and I did together. It was really simple just time consuming. All you need is a canvas, gel medium, foam paint brush, credit card, spray bottle, and of course a blown up picture done with toner ink. I took my photos to Kinko's and they printed them out for me with toner ink for a $1.00 each. The big cost with this project is the Gel Medium, so I would wait until you have a coupon for Michael's or Hobby Lobby. If not the Gel Medium is about $13.00.

The first step:

Paint your canvas with gel medium. Spray the blown up picture and place it face down on canvas. Take a credit card and press out any bubbles you have. I started from the middle and worked my way out. Let it dry overnight.

Second step:

Spray the paper until you can see the picture completely. Very Slowly pull the paper off. Rub off as much of the remaining paper as you can. Some of the picture will come off so easy does it. Let it dry.

Third Step:

Spray the canvas to rub off more paper. I found that a damp sponge was helpful. You can repeat this process as many times as you want until it looks the way you want it. Just remember the more you rub the more the picture will come off.

Fourth Step:

Once your happy with your canvas you can finish by painting a last coat of gel medium or modge podge to seal it. It's really whatever you prefer. I had so much gel medium left I just used that and was happy with the results.

I hope everyone is as happy with their distressed canvas as I am.

LinkWithin

Related Posts with Thumbnails